Showing posts with label diy. Show all posts

Tuesday, December 13, 2011

DIY Decor: Glass Bottle Fireplace

I am a firm believer with being just as fashionable in your home as on the street, I.E. decorating your home to be as fabulous as you are. DIY decor is an easy way to channel your inner creativity and have a beautiful home in the process. Many people (myself included) love glass bottle fireplace decoration...or any decoration with your wine and liquor bottles, so here is how you can do that without risking a college dorm room mishap.

1. Start by stripping your collection of bottles.
You can do this easily by soaking them in hot water for 30 minutes. The labels will peel right off.

2. Clean out your fireplace of any debris or tacky dated accessories.

3. Carve the base of the candlesticks to fit the opening of each bottle.

4. Arrange the bottles, place in the fireplace, and light the candles for ambiance. 


This is a pretty simple DIY Decor project on the scale of 0 to Martha Stewart, you can be quite a novice. A glass bottle fireplace looks so nice to give a focal point to your fireplace without burning a fire (some of us may not be allowed to use our fireplace). 

How will you light your fire?

Monday, December 5, 2011

DIY Christmas Decorations: Paper Wreath

I hope you enjoyed the last DIY Christmas Decorations post on Winter White Pumpkins and have had a chance to turn your old Fall pumpkins into glitter creations. But the DIY continues as I continue to show you what my apartment looks like this holiday season. This particular Paper Wreath DIY project turned out better than I expected and is a great entrance to our Winter Wonderland, my roommates and I have set up for our upcoming Christmas party!

 
Paper Wreath
-drawing paper
-scissors
-large scallop edge circle paper punch (optional)
-pixie dust glitter
-Elmer's glue
-Pencil
-round styrofoam ring
-hot glue gun & sticks

time: approx 30hrs. 
This was my relaxing Thanksgiving weekend craft while I bunkered down
 with ongoing episodes of FRIENDS. That show never gets old. 


1. Start by cutting out circles from the drawing paper with a scallop edge like a cartoon flower.
**Tip: this is where you can use a large sized paper punch in this shape to be faster**
2. Cut out more than you think you will need. The more packed the circles are, the more full the paper wreath will look.


3. To make the paper cluster, use the blunt eraser edge of a pencil. Place it in the center of the circle and then fold and squish the sides along the pencil like you are covering the lid of a bowl with saran wrap.
**Tip: since this is thick paper, be sure to thoroughly crinkle the paper so it's softer looking.**


4. Then rub with your finger the edges of the paper clusters with Elmer's glue and immediately dip in pixie glitter. This will give the paper wreath it's snow-kissed look.


 5. Now begin hot glueing the paper clusters on the styrofoam round, tightly together. (Don't worry about waiting for the glitter to dry, it will get there). **Tip: use the pencil (eraser end) to hold the cluster while the glue dries (20-40 seconds). Since the clusters are so close, they will want to fall off unless the hot glue has dried.**

 6. Hot glue a ribbon to the back of your paper wreath to tie to your wreath hanger on your door.


Now your door will welcome your guests into your winter wonderland with your fabulous DIY Christmas decoration! Who said a paper wreath can't be chic? And you know my theory about anything that glitters...

Please post your DIY pics of your 
Christmas decorations on 
I'd love to see them!

Tuesday, November 29, 2011

DIY Christmas Decorations: Winter White Pumpkins

Christmas is my favorite holiday, so I go into Christmas decoration mode as soon as the Macy's Santa comes strolling down Broadway to Herald Square. So for my Black Friday, I strolled up Columbus Avenue to Michael's Arts & Crafts to get a couple tools to begin transforming my apartment into a winter wonderland. I began my DIY by turning my little Fall pumpkins into winter white pumpkins!

DIY Christmas Decorations: winter white pumpkins is a great project because it allows you to extend the life of your little Autumn gems...so here's what you'll need:

craft paint (cream/off-white)
paint brush
fine pixie glitter (white)
Elmer's glue
mini pumpkins


1. Paint the pumpkin white (except the base)
2. Let dry for 5-10 minutes


3. Flip over and paint base.
4. Let dry for 5-10 minutes.
**Repeat steps 1-4 for a second coat of paint**


5. Rub thin layer of Elmer's glue all over pumpkin with fingers.
6. Shake glitter on pumpkin immediately (over a clean-up paper). Be sure to coat evenly!


7. Allow to dry and then decorate chez vous!


I always love finding new DIY Christmas decorations for my home and this was first time attempting the winter white pumpkins. They turned out so great and took no time at all. I can't to show you the rest of my DIY Christmas decoration projects I have going on right now... so stay tuned!

What are you doing to DIY for Christmas?

Monday, November 21, 2011

Organize your Boots: DIY Boot Shapers

I did some major Fall cleaning this Saturday! After working for two straight weeks with only enough time to go home, sleep, and start all over...this weekend was a God send. My room however, was proof of my insane schedule, as it was in shambles. This is not my norm for acceptable tidiness and I was going crazy. Out of my Mary Poppins adventure I finally organized my closet further and found a solution to organize my boots! Enjoy this simple DIY Boot Shapers tutorial may it inspire you this Monday to reform your own closet and organize your boots!


DIY Boot Shapers


1. Start with some cardboard.


2. Cut out large rectangle pieces (one side of the box).
3. Roll them up, cardboard side out. Optional: Paint a fun color.
4. Hot glue in place to prevent unraveling. 


5. Organize your boots in your closet and enjoy your new found freedom of being able to find them all!


How chic will your closet look now?

Monday, October 10, 2011

Fashion 101: History of Turban Fashion

Turbans have long been a cycled trend of fashion that makes cameo appearances in our Western civilization. This Eastern staple is an accessory that lends an exotic hand in completing a look. But the history of turban fashion goes back further than Sex and the City 2 believe it or not! And in today's Fashion 101 you can discover just how far back our history books had us adorning our heads with this Eastern influence!


Source: flickr.com via Paula on Pinterest


Originally reigning from our more Eastern neighbors, the turban has long been worn for necessity as protection from sun and sand in the desert in addition to an important part of their religious costume. The forehead is always left exposed so that it may touch the ground during times of prayer and bowing. The colors and fabric ranges in accordance to class, education, religion, and occasion. For example, pink is associated with Spring and renewal and therefore is often used in wedding ceremonies in Northern India. And in Shi'a Islam wearing a black turban with a white cap symbolizes lineage from Muhammad and high education. Just as meanings of color vary by society so do the appropriateness of different turban styles.


Source: flickr.com via Pallavi on Pinterest


{merci JBTaylor}

The history of turban fashion began in the late 18th, early 19th century, when trade with India brought on the beginning of the turban as a Western fashion accessory. Being fore fronted by Marie Antoinette and even after her death, the turban remained an accessory staple in England and France.


We have Paul Poiret to thank for the revival of turban fashion in the early 20th century. By 1910 the turban had made a complete revival and was a staple in evening wear and the ultimately luxe society position.


As any fashion trend, the turban has cycled its way through our modern era, making brief cameo's of fabulousness. The history of turban fashion is very consistent with glamour. Whether it is a classic 1946 film noir, a 1970's British Vogue feature, a 1980's tribute to Joan Crawford played by Faye Dunaway, or Sarah Jessica Parker herself reviving the turban a la Carrie Bradshaw for the 21st century… what goes around comes around. And the truth is our Western civilization will always be swept away by the exotic elegance of the East with the turban


{merci JBStyle and Mystyle}

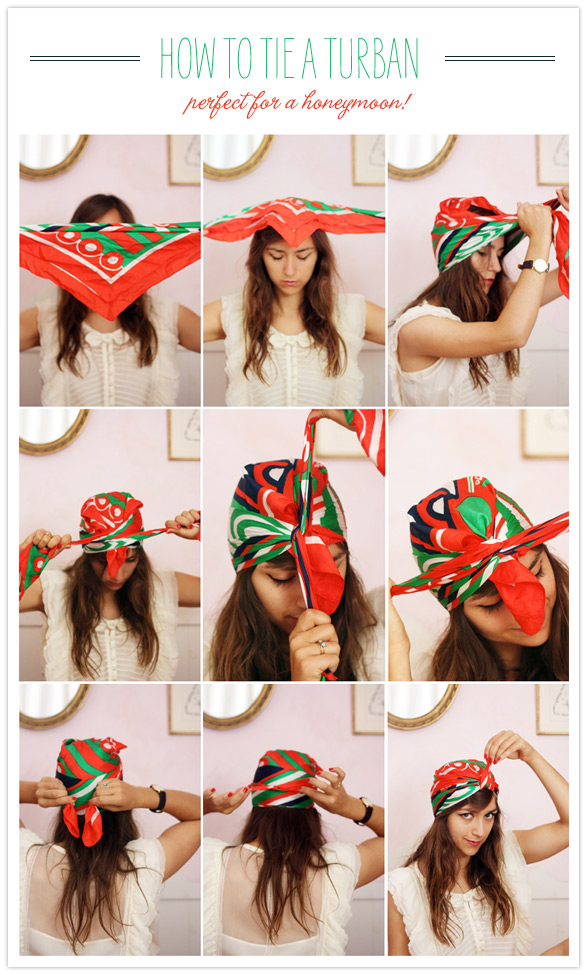
Be sure to do your Fashion 101 homework by incorporating a turban into your own ensemble this week! Here is a great tutorial on how to make a turban from a fabulous head scarf.


How will you jazz up the 
history of turban fashion 
to match your style?

Monday, October 3, 2011

Peacock Inspiration: How to Stylishly Extract Inspiration

In your wardrobe, sometimes it is hard to pull inspiration from something you love and it not be cliche. Case in point, you may really love peacocks, as I do, so you wear a shirt with a peacock feather print. How about a way to be more creative with your fashion? Just as a designer may pull inspiration from one element for their latest collection but it is never literal, it may be the color palette, or the seductive feeling it portrays, or the texture. Here are some ideas for a bit of peacock inspiration in your wardrobe. Translate it to your obsession as you will...

The God Given Original

Source: google.com via Lauren on Pinterest


The Slightly Too Literal Version (unless it's October 31st)


What Many People Might Do


Peacock Inspiration: Color


Peacock Inspiration: Soft Enveloping Texture


Peacock Inspiration: Seductive Silhouette 


So you see, for well styled inspiration you must derive aspects from the muse, not literal cliches of it. What are you obsessed with lately and how will now creatively bring that into your wardrobe in a subtle yet stylish way?


Don't FORGET today is the 
last day to enter the GIVEAWAY!

Thursday, August 11, 2011

Tapping In To Your Inner Artist: Charcoal Drawing

I spent five and a half hours yesterday drawing...that's right the better part of my working day was spent on a commissioned charcoal drawing! It has been so fabulous to dig back into my art supplies and reek havoc on a piece of blank paper! I just love the feeling of having charcoal in your hands, running it haphazardly along, swiping it here and there, blending it across the paper. Charcoal is such a wonderfully messy medium, I get excited just thinking about it. Here are some things that hopefully will get you tapping in to your inner artist!


Source: None via Emergency on Pinterest

You'll see that the content is all people, because that is my thing. I am just captivated by people, in fact people watching is a favorite past time of mine. You may not know, but I was originally an Art Studio major before I changed to Marketing, so my degree actually holds a minor in Art Studio. All of the artwork in my room is my own work from college and after. Charcoal drawings, ceramic vases, black and white photography, it lends for some great home decor. The subjects vary according to the medium of course, but each piece maintain a romantic nostalgic feel, because that is what pours from my soul.

Source: None via Gemma on Pinterest


"Tapping in to your inner artist is something very important to do, no matter what your profession. It allows you to never be wrong which grants you the power to create the impossible and let that bridge you to your new destination." ~Jessica 

What do these images inspire you to do?

Also, in light of the fact that I have not been able to be fully 
at my computer this week since it crashed. 
I have extended the giveaway!


Don't miss your chance! 
The giveaway ends Friday at Midnight NYC Time!!

Monday, July 11, 2011

Fashion DIY: Exercise Your Closet

That is right...I said exercise your closet, don't throw it away! If you are anything like me my dears, you have a closet and maybe dressers and storage boxes full of clothes! Do you wear them all? Yeah, me neither. That is where Fashion DIY becomes crucial!


Every season I try and weed through my addiction to pare down the fat which is a pretty daunting task...especially since I own many clothes that are too good to part with (from before I lost weight in France...and yes, I realize this is a good problem to have). Now that I find myself sans sewing machine in NYC (a fact that is killing me btdub) I can't actually fix these items, so they just sit there taking up very valuable Manhattan square footage. So what is Fashion DIY well its creating ways to upcycle your clothing, or shop in your own closet if you will!

Here's an easy fix that does not involve sewing skills or any real seamstress tools:

Color Dyeing
I recently bought a corset top from Forever 21 that I later gave me buyer's remorse (which is a sickness I almost never get). Of course when I tried to return said top...Forever 21 with their non-existent customer service policy, how very un-American, would not allow the brand new frock (that had not even left the bag) to be exchanged. So what was I to do? Dye it!!


Totally cute corset top...but in peach...which I later realize that under the my sheer summer tops, just looked like I was naked because it was the same color as my skin. Whoa! was I ever uncomfortable!

 1. Find the classic RIT dye at your pharmacy, in a color your choice (I happen to be a sucker for teal)


2. Mix (following package instructions) with water and bring to boil. 
3. Soak garment for instructed time. Note: more or less time should be altered for desired color. Looking for a pastel? Less. Deep jewel tone? More.


4. Thoroughly rinse and wash garment and allow to dry.


5. Style accordingly! 


And Voila! Fashion DIY at it's finest! Now my once bare-all corset top is a cute pop of color under my sheer summer pieces. Je l'adore! There is always a way to re-work your closet, you just have to get creative. Don't be afraid to play around with old pieces..try and wear them in unconventional ways, or dye them in the latest hot color. That Fashion DIY may just be the little CPR revival your wardrobe needed!

Go try your own Fashion DIY 
and report back!
Bonne chance mes cheris!

Copyright Rigmarole

Art is a product of original thought, creative compilation, and lots of blood, sweat, and tears...so please, please do not copy the content posted on this blog without permission.

Many photos are the property of Jessica Kelly Photography although not all are ghost marked, please do not use content unless an appropriate hyperlink back is created. And please shoot me an email... I like to spread the content love as a community.

I have tried to credit any outside content pulled as best I can. If you see anything miss credited please feel free to let me know so that I can fix that!
Related Posts with Thumbnails